Pages

Showing posts with label crackle paint. Show all posts

Friday, 12 March 2010

Easter elegance.


.
Yes i know it's a little early, but i finished Maddy's Easter prezzy today and couldn't wait to blog it. Click on the pics for a better look.
.
This lovely little egg trinket box started off as a delapilated mess on a charity shop shelf. It was bare apart from some of the beads going around it, it was scuffed, scratched and had the remains of a terrible paint job on it..... So i bought it with an Easter project in mind.
.

.

I've used Distress Crackle Paint on the egg itself, i mean eggs do crack now and again don't they? Painted with a thin coat, the crackles are lovely and fine. I also added a few little things to fancy it up a bit.
.
First i punched a simple heart out, distressed it a little and hand stitched around the edge.
.

.
A few fabric flowers and more beading dotted around the place...doesn't that crackle paint look great close up?
.

.
The little butterflies are lazer cut, and with a coat of antique cotton paint and a stamped text pattern on them, they really come to life on the project. I was able to enter this into the Charisma Cardz Challenges this week as they are ofter something with Beautiful Butterflies.
.

.
This pendant/charm was a great find, it originaly came as part of a belt, but in true Calv style i wrecked the belt and used the only bit that was left intact! I can also enter it in the Creative Inspirations "charms" challenge this week.
.

.
I know what you are thinking though, yes Calv that's fine but what about the choccy!!! Have i ever let you down yet? :)
.

.
Filled with mini easter eggs, Maddy has the choice of white, plain and dark choccy to indulge herself in.
.
What would this kind of project be without some reference to Alice in Wonderland? It gave me a chance to compliment the box with something nice, whilst using one of my fave stamps, an Alice in Wonderland quote...
.

.
This handmade scroll was made on patterned paper, wrapped around a couple of dowelling rods i chopped up this afternoon. Painted again with crackle paint and finished off with tiny brass knobs.
.
A dainty button and some ribbon later.....and Mr Carroll would have been proud of me! :)
.

.
I love these butterflies...
.

.
A close up of the wonderfull quote...
.


.
So there you have it, one Easter prezzy for my partner in crime. :) Hopefully Maddy will forgive me for spoiling the suprise, she'll just have to wait for the choccy now.....i'm sure i'll take good care of it. :)
.
Thanks for looking everyone.....and Happy early Easter!!!
.


Thursday, 12 March 2009

Veg i inked today!!!

Good evening everyone! :) I hope you are all well this week?

Welcome to another episode of "Veg i inked today!", that strange time of the week when we take a break for the norm and cast our eyes over the sometimes more artful side of fruit and veg!

Now usually i pick a few veggies to ink, and decide when i get home. It's hand to have a back up just in case one goes wrong. So why of why didn't i do that this week?!!! Whilst shopping this afternoon. i made the rash and over confident decision to try just one veg. Not only just one, but one that i knew i would probably have trouble with.

It was a challenge though, so i took it on....sadly i fear i should have left it in the supermarket!

Please ladies and gents, accept my apologies.....for the TOMATO!!!
.


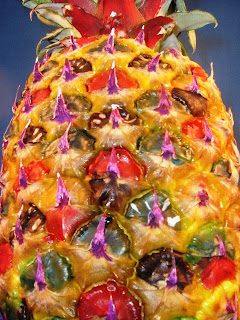
What an unsightly mess!!! I tried doing something different this week and used crackle paint. Bit of a tip for you....crackle paint does not like vegetables!!!
.
Bit's came off, some didn't crackle. It did give me a nice white base to ink on, which i was looking forward to as i wasn't relishing inking on a red background.
.
There are a few nice colours there, but nothing that jumps out at me. It was a nightmare to handle too, with paint coming off each time it was touched. Not good.
.


So as you can imagine, the veginkability rating for this will be poor I'm afraid. It will have to be a 2!
Sorry but that's all this little red fella deserves. I was sure that the shiny red smooth skin of this veg would be a pleasure to ink, but alas it was not to be.

As you know though, we learn by our mistakes and this week i learnt a lot.

Oh yes, whilst i remember, some people have in the past asked if it is real fruit that i ink, so here's the proof....i cut this weeks subject in half for a piccy.....in fact i think this piccy is nicer than the complete thing!


On a more positive note, i have been balancing out my fruit and veg inking habit, by learning to grow my own fruit and veg at home. I figured that it would be cheaper too, so I've started with the basics, onions, peas, carrots, potatoes, strawberries and a grape tree.
.
All is going well so far, I've learnt a lot thanks to the Internet and some wonderfully helpful friends. Hopefully i will succeed with growing it all, and become a little more self sufficient.
.
As well as all this, i have been trying to attract more wildlife into my garden. As well as birds and the usual visitors to my pond, i wanted to do my bit to save the bee. I haven't got the room or experience for a honeybee hive, so instead i bought a solitary bee hive.
.
What do you call a place of shelter for bees though? Well where might you stay when you go away?....A Bee & Bee of course!!!
.
Pretty cool eh? :)
.
At first Maddy was quite concerned that i was getting this for the garden, she knows me too well i guess! However i scoured the Internet for advice from beekeepers who were most helpful. It would appear that this will attract and provide a shelter for "solitary" bees that you get in the garden. So only one bee will shelter in each hole and maybe lay an egg.
.
.
Apparently it is really hard for bees to find shelter, and there are so many reports of them dieing off, so i hope that i will get some visitors to my Bee & Bee.
.
This particular hive is made in stackable sections, so it will be great for education the kids and also for cleaning when it's not in use.
.
So that's it from me this week, wish me luck with my fruit and veg growing...and that you don't see me running down the road with a swarm of bees around me! :)
.
Take care all.....till next week.

Saturday, 21 February 2009

Welcome....to "Inky Cottage".

Hi everyone....over the past week I've been working on a project i have been meaning to do for ages. Storage for my mini ink pads.

I usually have them lying around, or shoved in a basket where i can't see them properly, so i did what any good crafter would have done.....gave them a home. Not just any home though, i gave them Inky Cottage! :)


I wouldn't mind living there myself! Inky Cottage was made with the stunning TwiddlyBitz Chipboard - Christmas Advent House Kit from Karen at Charmed Cards and Crafts. Thank you Karen :)

As soon as i saw this kit in Karens shop, i knew it would be great for storage. As you can see, as well as it accommodating the eye shaped ink pads perfectly, my Twinkling H20's were having a sleepover too!


I did this in crackle paint, then brushed randomly with Distress Ink to dirty it up a bit. I wanted to get the feel of a lovely cottage that you might stumble upon deep in the woods. That's why i added the bits of twig on the roof to look like there were roots and ivy growing over it.


There are so many uses for this, i tried some of my smaller wood mounted stamps and they fit lovely in there as well. You could make boxes for each hole, and fill them with crafty stash, brads, buttons etc.


I reckon it will look quite nice up on my scrap room wall....what do you think?


Thanks for looking. :)


Friday, 9 January 2009

Heart box for my girls.

Hi again :)
.
After making a box for Maddy, i thought it would just the thing that little girls would love on their dressing table. As luck would have it, i have two daughters that love anything girly, so today i made their very own little boxes. Here's the first one, I'll do the other one later....


Very simple to do, i also wanted to post this as an example of how the most basic make can be made from just a couple of items of stash, yet it still looks like something you'd buy in one of these shabby chic type shops.
.
.
This is just one of those small chipboard boxes that you can get for under a pound, painted with one coat of crackle paint, a couple of embellishments stuck on it and trimmed with lace. It's really as simple as that.
.

.
Quick tip with crackle paint, same as with crackle glaze, the thicker the coat of paint, the bigger the cracks. You can see here where i've done it thicker. I prefer the smaller cracks as they are less likely to flake off.
.
.
Anyway, a quick and easy project for the little, or more mature girls in your life! :)
Thanks for looking.