Pages

Saturday, 6 September 2008

What i've learnt today.....

I've been after something to wear whilst crafting as i seem to wreck everything i craft in!

After the thousandth time accidentally splattering alcohol ink on my clothes, i decided to make a crafty t-shirt, something i am not fussed about getting messy.

So after investigating a few methods of applying different colours to fabric, i have learnt the following things.....

1. Always listen to your fellow crafters!!! If they say that alcohol ink is not great on fabric, don't think it "may be different for your t-shirt!

2. Permanent calligraphy markers, whilst good on other materials......look rubbish on fabric! They bleed, don't write smooth and basically make a hash up of your already hashed up t-shirt project!!!

3. StaZon does not come out nice when stamped on fabric. I guess the material soaks it up and you can hardly see the result!

4. Distress pads do not make your t-shirt look vintage.....it looks like you need a bath!

5. Finally, no matter how many of Tim Holtz's videos you have watched, no matter how easy Tim and other crafters make the blending technique look.......it will not work on a t-shirt!!!!!! Well not mine anyway!

So i now have a t-shirt that looks like it's subjected to a frenzied ink attack, by a colourblind two year old!!!


How not to do it!


On a positive note, i now have a t-shirt that really can't get any worse through crafty spillages!!!
Back to the drawing board methinks. Time to go and learn how to make decent t-shirts!

Thursday, 4 September 2008

Made a card tonight!

More of a colourfull play about really, but over at the Crafts By Carolyn forum, one of the many competitions that are running is one to make a card with just stamps and inks. No patterned paper.

So i dug my Tilda stamp out, she's been a bit neglected lately, my chalks and Whisper pens, and a lovely Lavina willow branch stamp.

Click the image for a better view.

Yes my fruity friends.....

It's that time of the week already, oh yes indeedy it's Thursday and we all know what that means......it's time for "Fruit i inked today!".

It's the one day in your busy schedules where you allow yourself to dive into the world of the juicy.

After last weeks inked grape, i felt i needed to produce something with a little more excitement about it. I had a great suggestion of a star fruit, however trying to find one of those in my local supermarket was maybe a little ambitious!

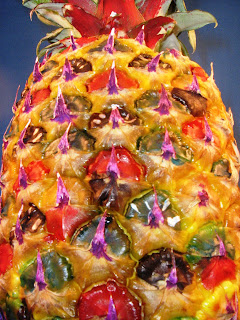
So in the end, i threw the fruity rule book out of the window......and without further ado......good people of the craft world.....may i present to you the monster that is the pineapple!!!!!!!!!


Well what can i say!!! An inky challenge was what i asked for, and thats exactly what i got!

I had to put a little time and effort into this one, not just a dab and hope for the best. That would have potentialy been a huge mess with me doing it! Well this beauty was an absoloute pleasure to ink. There were several different textures to work on, the main body segments were nice and shiny, so the ink flowed lovely over them, and the leaves just soaked the ink as soon as i touched them.

You've probably guessed that i did not use an ink applicator for this one, in fact i used a fine paint brush to apply the inks. I was going to add mixative and blending solution, but the result was so good without it, i thought it was a shame to go any further.

I also had a bash at stamping the leaves, but it didn't turn out too good. The segments that appear gren are actualy inked with Adorindack "Pitch black", it just turned out that colour against the yellow of the pineapple. Other colours used were Wild plum, Red chilli pepper, Stream blue and lettuce. A mighty fine coctail!

Now then, "Whats the scores on the doors for fruitinkability dagnammit!!!?" i hear you cry?
Well i had some much fun inking this, and was so pleased with the result, i'm going to have to give it a
fruitinkability rating of 7!!! It's going to take some beating to top this one, but i could'nt score it any higher as there HAS to be the perfect fruit out there for inking?

I will make it my mission to find that fruit, and when i do,....oh yes my friends......ink will fly in my craft room that fine day!!! It's just gone 5am and i need some beauty sleep. Thanks for tuning in, same time next week.......keep that Thursday free people!!! :)

I'll leave you with one more pic...looking up the belly of the beast!!!


Reminder: Do not attempt to eat anything covered with alcohol ink, whilst most people aren't that stupid, theres always someone who likes to be an exception to the rule!

Don't ask me what it is!

Not sure what it was intended to be, but i saw these words on a poster today and thought they would look good on a sign. So i started this tonight, bit tired so will do more later.


Wednesday, 3 September 2008

A couple of tools i made.

I put this on the Crafts By Carolyn forum a while back, a very quick and easy way of making yourself a chalking tool for under 50p, and you can decorate it anyway you want.


Tutorial......get ready for this......it's a tricky one!

1. Get a crocodile clip from any hardware or electric shop.

2. Get some dowelling, this was about 4 or 5mm width dowelling. How long you have it is up to you, i do mine about pencil length.

3. Put some decent glue on one end of the dowelling
and slide it into the gap in the crocodile clip. I used Araldite Epoxy Rapid, sets real fast and lasts forever!

4. Decorate as you wish. I did simple petals on this one, my girls did a couple with dots all over them like aboriginal art. I put a coat of quick drying varnish over the top to save your paintwork. I used Fimo varnish on this one.

Thats it, one chalking tool.

I've got a couple of these that are double ended, (clip at either end) so if you want to have two chalking balls on the go at once without swapping over all the time, you can.

(Calv's safety tip: If using any kind of epoxy resin glue, please go carefull with it. If you want stories about accidents and glue......just grab a coffee and pull up a chair coz i'm your man!!! Epoxy is extremely hard to get off skin when you accidentally step on a blob and glue your bare foot to the kitchen floor too.....apparently!)

Small amounts of glue on your skin are usually manageable, but if like i did one day you accidentaly burst an ENTIRE tube of superglue in your hands.......and stick your hands together and the tube to your hands too.........(don't ask!).........do not try pulling your hands apart without soaking them in some kind of thinner first. It's real painfull. I got mine off by soaking my hands in a bowl of nail varnish remover with acetone in for 20 minutes.

If i remember rightly though, i was in my dressing gown, hands stuck firmly together, and my girlfriend went for her camera before the first aid box though!

How very considerate! :)


Next....an easel. It doesn't matter if you buy or make this as i did, a small easel in your craft room can be used to display finished work or a work in progress.


I won't do a tutorial for this one, as i found out places like Ikea do them for about 50p (bet mine lasts longer though!), but heres my handmade one in action.

They can fit 12 x 12's on them.......


....or as a cheap book stand whilst working from a book.....


Screw and glue, thats all i did with this.

Wall mounted magazine rack/12 x 12 storage.

Heres a piccy of a magazine rack i made for my girlfriends craft room, she needed somewhere to store a few of her current crafty mags.


I would like to point out that i am not a carpenter in any way shape or form. I just measure the wood, and tack/screw/stick it together in more or less the shape i want it. What i'm saying is, most people out there could do this with a few tools. I bored loads of holes in the front not only as feature, but so the colours of the crafty mags would show through. It works sometimes. :)

This was a first effort so it wasn't perfect, you can adjust the measurements to fit 12 x 12 papers, all you need are two sides, a front and a back. I am making some more but with a nicer design to them, a bit of a curve here and there made with a jig-saw. The holes were made with a hole-saw, you can get them cheap at most hardware shops.


I used 3mm MDF board for this. Cheap and easy to work with. Make sure you glue it as well as screw it, those magazines and paper stacks can weigh a fair bit when they mount up.

Tuesday, 2 September 2008

Is a male crafter really an oddity?

"Men" and "Crafts". Who would have thought that two simple words such as these, could be viewed in so many "strange" ways when used together?

I guess for many people, more so those not involved in crafts of any kind, the thought of men crafting conjures up images of woodworkers and the likes, the more "masculine" crafts as some would like to think.

So today i was in town paying off an overdue library book fine, large enough that i could have bought the book brand new!.......anyway......i stopped into a new fabric shop to get some material for a paper craft project i had in mind. I wanted something to cover a "Journey" themed album with and found this lovely cotton with a map of the world on it. Not cheap but will be worth it on a project.......i got this one in a lovely blue and brown.....


..and one in a Sepia colour too....


Whilst i was in the shop, another guy came in looking for material. By the sounds of it, he obviously knew his stuff and we both went about our business looking through the fabrics. The shop owner, a very nice lady, said that she'd never had two men being the only customers in her shop at one time. It was as though it was unheard of.

Then shortly afterwards, i met an old friend. He has an office job and has in the past, like myself, served in the armed forces. So we go through the usual banter of what are you up to now, and then i mention that I'm into crafting. I may have well said that i was wearing women's underwear and was off to get my hair and nails done!!!

There was the stifled laugh and raised eyebrows, nothing that i have not experienced before but nevertheless. We chatted for a bit before parting company. I guess it bugged me a little, but then i quickly thought about some of the other things he said. He wasn't all that happy in his job, but was too stuck in the system to get out and do anything else. That was enough for me to smile and think about how glad i do what i do.

Whether it be as a hobby or as a career, crafting as we know it, is what i love and enjoy. Someone once said, "You gotta do what you love!". There are many reasons why i do what i do, but best of all, I'm happy, it benefits me, my partner and my kids! End of!

There is a noticeable lack of role models in the world of the male crafter, maybe thats a factor that prevents so many younger lads starting out in crafting? I am a big fan of Tim Holtz and his work, but how many other well established male crafters do i know of? Not many at all. Thats something i would like to do something about and i will.

Throughout history men have been skilled in what is classed as the more feminine of crafts. Big rough hardy fishermen used to knit thier own jumpers, and some of the best tapestry makers I've known learnt thier skill in the armed forces. Not that you need a macho background or other side to your life to balance the crafting out, personally i couldn't care less what you've done in the past or what you do now ( I mean that in a nice way of course)......if you craft and enjoy it.......then thats good enough for me!!!

Maybe you just have to be secure in yourself, or not give a hoot what people think to be a male in this area of crafts. Maybe a recruiting campaign is needed for male crafters, or to encourage them to come out of the woodwork!

Anyway, I've rambled enough, just wanted to get that off my chest....although i have a feeling it won't be the last time!

Take care all......I'm off to do my nails! :)

Monday, 1 September 2008

Ribbon storage tip.

I've spent the last half an hour sorting out a ribbon jar that was hiding away at the end of the craft table. Jammed full of ribbons, so they were mostly out of sight and therefore, mostly unused.

However i recently saw a girl demonstrate a great ribbon storage tip on YouTube, all you need is a book ring and some paperclips or safety pins.


Now the few strands i had are hanging straight instead of crumpled in a jar, on show so i can see what i have......and it adds colour to my craft room.

Great cheap little tip!

Beer mat note holder.

The landlord at my local pub very kindly gave my kids a load of beer mats for crafting with, so as a thank you they made him a note holder for the pub office.


A very simple project, ideal for kids as there is no measuring, (mine find that bit boring!).

The pic is self explanatory really, but heres the easiest step by step ever!........

1. Get two beermats and cover them both sides. Preferably with dad's best DCWV "Once Upon A Time" papers!!!!!!!!!!!!!!!!

2. Stick your pad in place, leaving enough room at the top for your ribbon holes.

3. Choose a nice length of ribbon and thread it through two holes made in the beer mats with a Crop-A-Dile or hole punch. Tie in a secure knot that will not come undone. The kids strengthened the holes with eyelets to stop wear and tear from the ribbon. (Note: Do not try to punch through the post-it pad, the holes only need to go through the top of the mats).

4. Embellish as you desire. Here my kids made a tag, they just cut it to the shape of luggage tag, a quick wipe with a distress pad, and added some thonging. (I did the writing though.)

So thats it. One beermat post-it holder.

I think thats enough on post-it holders for a while, enjoyable as they are to make, addictive too.....i do need to get my teeth into something different.

Dangerous DIYing.

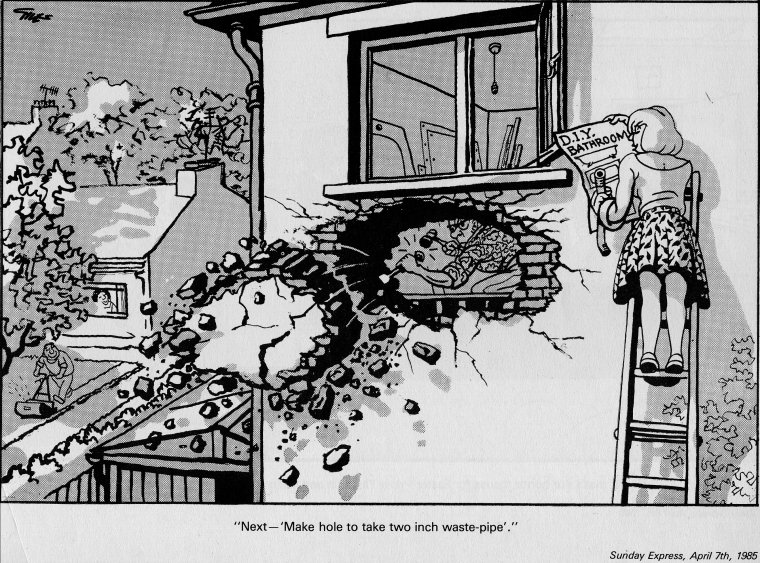
I used to love the old Giles cartoons from the newspaper here in the UK, now and again i take a look at some random cartoons from thier archives.

Today i found a great one which could have been drawn for me! My girlfriend will relate to this, i'm always doing DIY at her place, and the results are as eventfull as my crafty projects!

Click on the cartoon for a bigger image and the caption under it. :)