Pages

Showing posts with label Distress ink. Show all posts

Tuesday, 17 February 2009

A fantasy 12 x 12.

Hi all,

Recently i have been working on something for Jennie at The Artistic Stamper. She will be at the Make-It craft show at Farnborough, Hants from 20th - 22nd Feb, and i was asked to make something for the stand.

I was asked to do something with one of my fairy doors i make. I haven't made any for a while so this was a great opportunity to dust off the chisel and set about something special for the show. After sitting in my craft room for days on end wondering what to make, i came up with this 12 x 12 layout.


I am quite chuffed with the end result, at first i was doubtful whether something so "blocky" as a wooden door would suit a paper craft layout, but this actually fits quite well with the fantasy theme.


At first i went with a very plain background 12 x 12 paper, but then i came across this one from the DCWV "Once Upon A Time collection". All I've ever done with that collection was stroked it lol, so it was a pleasure to use it on this LO.
.
The door itself was kind of a new experiment for me, in that i usually spend a long process getting the finish right with paints and varnish. However here i used a thin coat of Picket White Tim Holtz Distress Crackle Paint for the finish, and what a result! I am so pleased with how this turned out, just as you'd imagine an old weathered painted door to look.


Another first for me was the fact that this door can open! :)


A single brass hinge covered with ultra fine glitter, allows the door to swing open, revealing a hidden world behind it....
.

The view behind the door was made by covering a backing paper from the Crafty Individual "Trees" range, with ultra thick embossing enamel (UTEE), then i sealed some pine branch punch leaves under another layer of UTEE. The effect looks real magical in real life, you could almost get away with thinking it was underwater.
.


Now until this project, i have to confess to having been an absolute oaf at embossing! However i recently purchased an anti-static pad which appears to have made a major difference. On this layout, i really wanted to use one of the any of Jennie's Calligraphic background mats, and as you can see, it worked beautifully with embossed gold against the background layer of greeny-blue distress ink. I also edged the whole 12 x 12 with embossed gold. The embossing isn't perfect, but i'm still a learner so go easy. :)

Another product that totally sold itself to me whilst using it, was the Tim Holtz masks. I used a couple of pieces from the "Time works" sheet. I blended distress ink over the masks so that it was similar to the 12 x 12 paper, i think it turned out pretty well and i really enjoyed using these.

I thought the Once Upon A "Time" wording fitted nicely with the clock piece....

What else is there....ah yes.....a little tag made from black stamp board and embossed with one of Jennie's stamps, backed with a crackle glazed stamped paper.


Finaly, i have to mention the door plaque. The name of Jennie's challenge blog and another one of her stamps. Anyone who has seen my doors before, knows they are hand carved, and this plaque was no exception. I think it goes with the door nicely.

So i just wanted to say a big thank you to Jennie and Hel's for asking me to do this, it opened my eyes to a few techniques that i have been wanting to try for a while now, as well as trying out new products.

Talking of which, here are the products i used from Jennie's shop, all which can be found here...

Various rubber stamps, including background mats, flourishes and word stamps....

Calligraphic mat 3 for the gold embossed background.

"Object d' Art" stamp for door plaque.

"ART" stamp for the embossed tag.

Flourish swirl stamp (part of) for around the door.

Flourish swirl stamp for embossing on page.

"Diamonds" texture mat for "ART" tag backing.


Various colours of Distress Ink applied with the blending tool and foam pads.


Crackle Accents. for back of "ART" tag.


Thank you for taking a look.....hope you like it. :)


Saturday, 17 January 2009

A fun tag.

Hi everyone :)

Tonight i wanted to make something fun for a change, i really enjoy making the more dainty things for my kids, but sometimes it's nice to have a change.

This evening i laughed harder than i have in a long time! It was the ultimate belly laugh which almost stopped me breathing it went on that long.....so in honour of the funny, yet near fateful moment tonight, i did this tag......


My girls had finished their homework, and they wanted to play charades, so we did. Now my two, as I'm sure most kids do at their age, change the rules or get them wrong from time to time.

Well you know when you start off, you have to do the action for a book, a film or a song? Well my eldest was doing some kind of strange "pushing" motion with both hands, as if she was posting something through a letterbox or something?

She assured me it wasn't a movie, a book or a song...but kept "pushing something in". In the end i asked her what it was, to which she replied, "It's a DVD!" She was doing the actions of putting a DVD into the player lol. :)

That well and truly made me crack up laughing......i had tears streaming down my face. :)


I enjoyed this tag, it turned out better than i expected. First i stamped some paper with a fantastic new background stamp from Jennie at The Artistic Stamper. She'll probably clobber me for saying this, but i couldn't remember if it was a snakeskin or a cracked wall texture, so i decided it would go well with a "cracked" theme. *Edited to say, i just looked it Jennie's shop and it's "lace". I knew it. :)

Some blending with Distress Inks for a bit of colour, followed by a real hash job with Copics on the image. Maddy will shoot me when she sees this lol, she taught me some real cool techniques with Copics, but i managed to mess them up tonight. Maybe next time. :)

Best bit about this was the words, i drew them myself and thought the cracks did them justice. I thought they looked pretty cool.

So there you have it, one fun tag. Hope you like it.

Night all. :)

Tuesday, 9 December 2008

Back with a tag.

Hi all :)

Sorry for being absent recently, have had a few things on. he the longer i was gone from here, the less crafty i felt. Not good.

So tonight i sat down and forced myself to do a real basic tag....


Nothing too fancy, background paper from the DCWV "Once Upon A Time" collection, some blending with Distress Inks, some ferns from my new Fern Family punch, and stamped willow branches.....not forgetting a fairy in the forest, courtesy of Maddy who gave me a set of lovely fairy stamps (Cheers Maddy xx). A bit of ribbon around the edge and that was enough for me to feel crafty again.

I made this because it has been in my head constantly lately. My youngest watched the video about the Cottingley Fairies the other day, it's her fave. She now wants us to go into the forest and find our very own "beck" (like a stream) where fairies live. :)

Thank you once again for all of you who have visited recently, and a big thank you to those who have commented. It's nice to come back to such nice and funny comments when you're up to your ears in it! :)

Wednesday, 26 November 2008

A mathamatical labour of love.

Hi all :)

As i type this i am literally dropping on my feet from tiredness. All my girls have been saying since i picked them up from school today is, "You look very tired Daddy".

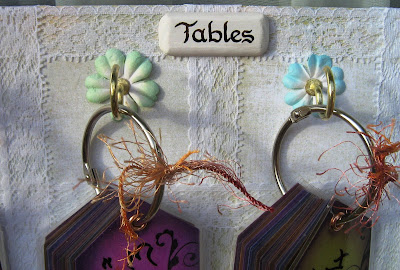
That would be due to my latest project for them below, a times table tag board.....don't forget to click on the image for a larger view......


I have been working on this for a few days, my girls wanted something to help them with their tables, so i thought about putting some tags on book rings which they could flick through.

Then came the idea of doing a whole set.....1's to 12's, all 12 tables in each set.

So i started, and what followed was the most tiring project i have ever done! Not because it was difficult, it was the repetitiveness of everything. More about that later though. I'm really pleased with how it turned out.....


The board is just MDF, covered with a couple of bits of Wassail paper. The lace was layed around the edges and also across the board so it sectioned it into squares. This was handy as the tags fitted into each one nicely.

A bit of fibre on each book ring went nicely, and a Prima bloom behind the brass hooks looks gorgeous. I made a little wooden sign for the top too :)

Finished off nicely with some brass filigree corners, and there you have it......one full set of times tables for the kids to learn with.


Now as i said at the start, this was a labour of love. "Labour" being the operative word!

Just to give you an idea of what i did, in case you were thinking of giving it a go.....

1. Cut 144 tags on the Big Shot.
2. Stamp flourishes on all 144 tags.
3. Blend all 144 tags with Distress Inks.
4. Then edge all 144 tags with another colour. (I was tired at this point!)
5. Write the times tables on every tag.
6. Round the corners of every tag. Two corners on each.....288 corners!
7. Laminate each tag.
8. Hand cut round every laminated tag. (I'm wondering why i started this now!)
9. Crop-A-Dile punch all 144 tags.
10. Eyelet all 144 tags.
11. Book ring and add fibres to them.
12. Spend a day making the board.

The only reason i kept going was because my eldest learnt her tables so quickly with the one set i did the other day, i knew it would be worth it in the end. The look on thier little faces was a picture when they saw it. :)

I do however seem to have aged 10 years!

I would love to make these for the girls primary school, but i think it will be a while before that happens! :)

Sunday, 19 October 2008

Fimo toadstool tutorial.

Ok folks, i've had a few people asking how i made these toadstools, so i have done a basic tutorial with some pics to get you there. Please remember, this is about the third time i've ever dabbled with Fimo, so whilst it shows that anyone can do this, it also means i'm no expert. This is just the way i made them, there are probably better ways around though.

So here we go...oh and before i start, if anyone wonders why i have a lot of full stops or dots between my paragraphs, it's because Blogger is seriously having a giggle with my posting abilities at the moment, no matter how well i space them out in the editing thingy....it just crams them together when i publish!!! Hopefully the piccies are ok, i'm doing it by daylight bulb in my craft room...

Moan over.....here we go......take two!.... :)

First you need some Fimo, i used the Fimo Classic here....


Cut off 1/4th of it, that's all you need for a toadstool of this size...
.

You now need to make two balls of equal size. To do this, just cut your piece in two before you start rolling the balls......cheers for that tip Maddy! :)


Then roll the two balls......one will be your stem, and the other your top.

.
Take the first ball, and roll it into a sausage shape.....


Then taking an end in each hand between the fingers, twist it alternating ways (one end forwards whilst the other twists backwards......apologies if that sounds like i'm teaching anyone to suck eggs, believe me when i say i need to make it clear so that I can remember it!!! :)
Now you have your twisted stem. You don't have to have a twist in it, in fact i'm not sure that real toadstools do at all.....i just like it!

.
So that's your stem done. Put it to one side and take your second ball of clay. Flatten it with the pad of your finger/thumb until it's quite flat, about 3 or 4 mm.


Now to mark the underside with the toadstools gills....i just marked a dot in the middle as a guide, then pressed with the blade of a craft knife to get the markings. Tip, if you find it hard spacing the lines out properly, mark a cross, then half the segments in that, then half the segments again......and so on. It doesn't have to be perfect though......have you ever seen a toadstool that was?
.
.
Turn it over, then for added effect, i cut small chips into the edge of the toadstool...
.
.
Next take the toadstool roof, and press the edges slightly to thin out the rounded edges. You can use two hands for this, one to hold, one to press. I just couldn't as i had to take a piccy!
.
.
That's the roof done......now push the stem up into the centre of the roof. Do this firmly enough to make it stick, but gentle enough not to go through the top. Hey presto....one Fimo toadstool!!!
.
.
Please do not fret if you think it looks rubbish at this stage, once it's gone hard and you have added some colour later, it looks so much better! Really brings out the realism to it.
.
Now go and stick it in the oven. I did mine for 30 mins at Gas Mark half, or 110 degrees F/240 degrees C. Once done, let it cool thoroughly.
.
Time to give it some colour. Below are the colours i used. A Dark Moss and charcoal Colourbox ink, and a Fired Brick and Tea Dye Distress ink pad. These were applied with a standard 1/2in paint brush i found in my shed. Oh yes...only the best tools for Calv! :)
.
.
First off, i applied the Dark Moss to the stem. I just jabbed the brush into the ink pad, then flicked the brush around the stem rather than "painted it. This ensured any little nooks and cranny's were coloured.
.
.
Then i turned it over and did the underside in Charcoal ink...
.
.
I just gave the edge a little ink too......
.
.
Lastly, colour the top. I used two layers of colour on this one, Tea Dye first then after a quick dry with a heat gun, i brushed it with Fired Brick to give it a reddish hint.
So there you go.......one finished toadstool!

.
The underside......
.
.
Thanks for staying awake through this, this really is a simple piece to make, even my ten year old made one to this standard today with only verbal input from me. I would love it if you could pass this method on to anyone who is new to Fimo like myself, and if that someone was a little one, it would make it all the more special.