Pages

Thursday 27 November 2008

Fruit i inked today! Danger Danger!!!

All is not good in the land of the fruit inker my friends! :(

Whilst i welcome you all once again to "Fruit i inked today!", i am sorry to say that i have a story to tell that is one full of failure......and DANGER!!!

Good evening my little fruitbats :) Yes it's Thursday again and if you've come in search of a triumphant fruit masterpiece, i am afraid i have failed you.....badly!

I said at the beginning of "Fruit i inked today!", we would have the ups and the downs of fruit inking here, and tonight i truly mastered the art of the "down". Faithful fans of the fruit fetish.....may i offer you my sincere apologies......for the PEAR!!!


Whilst at first glance you may think it's not all that bad compared to some of my fruits, i promise you, this one lived up to it's name and went totally pearshaped!!!

After last weeks success with the UTEE, i decided to try it on the pear. All went well at first, but then it started bubbling badly. I thought it had something to do with the heatgun being to close, so i adjusted that and still it bubbled.

What in fact was happening, and i tell this as a warning, was that the pear was cooking inside and the bubbling was the juices overheating! I discovered this when a huge pear juice bubble burst and sizzled on my arm!!! Not good....not good at all!!! :(


Granted there are some nice colours to be found in there at times, but the UTEE just would not melt nicely on it, instead choosing to mess me about and stay lumpy!

Due to the shape of the pear, the UTEE kept running downwards which was real annoying, in the end, and after two more pear juice explosions, i chose to call it a night! I am shattered from doing the girls times tables tags this week, i hurt my knee tonight which almost ended me up in hospital....so theres no way i'm putting my life on the line for an unco-operative pear!

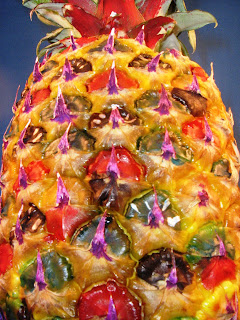
Even an aerial view didn't produce a good pic, a kind of nice spiral effect maybe, but even thats at a push....


Note the little bubbles of cooking pear juice at the bottom of the pear above.......dangerous stuff my fruity friends......dangerous stuff! I'm talking almost on par with "prickly pear" danger level.....and we all remember what happened to me with that little devil don't we?

As for the fruitinkability rating......this doesn't even deserve one, however i guess it should get at least a 2 for sitting still whilst i messed it up!

As a small consolation, i tried to make it up to you all with a few blueberries.....but have you ever tried to ink something that small?

You can't hold them, so i tried something new and let the fruit do the work. I placed some drops of ink on a plate, added a few blueberries and let the roll around to their hearts content. The result wasn't great either, but if it takes your mind off the pear for two seconds, it's gotta be good!


Thats me for tonight my friends, i'm beat! Thank you all for popping in tonight, it's a pleasure to entertain you as always. I hope you are all well and are having a crafty week, i look forward to seeing you all again next Thursday for another episode of, "Fruit i inked today!".
Nite all. :)

Wednesday 26 November 2008

A mathamatical labour of love.

Hi all :)

As i type this i am literally dropping on my feet from tiredness. All my girls have been saying since i picked them up from school today is, "You look very tired Daddy".

That would be due to my latest project for them below, a times table tag board.....don't forget to click on the image for a larger view......


I have been working on this for a few days, my girls wanted something to help them with their tables, so i thought about putting some tags on book rings which they could flick through.

Then came the idea of doing a whole set.....1's to 12's, all 12 tables in each set.

So i started, and what followed was the most tiring project i have ever done! Not because it was difficult, it was the repetitiveness of everything. More about that later though. I'm really pleased with how it turned out.....


The board is just MDF, covered with a couple of bits of Wassail paper. The lace was layed around the edges and also across the board so it sectioned it into squares. This was handy as the tags fitted into each one nicely.

A bit of fibre on each book ring went nicely, and a Prima bloom behind the brass hooks looks gorgeous. I made a little wooden sign for the top too :)

Finished off nicely with some brass filigree corners, and there you have it......one full set of times tables for the kids to learn with.


Now as i said at the start, this was a labour of love. "Labour" being the operative word!

Just to give you an idea of what i did, in case you were thinking of giving it a go.....

1. Cut 144 tags on the Big Shot.
2. Stamp flourishes on all 144 tags.
3. Blend all 144 tags with Distress Inks.
4. Then edge all 144 tags with another colour. (I was tired at this point!)
5. Write the times tables on every tag.
6. Round the corners of every tag. Two corners on each.....288 corners!
7. Laminate each tag.
8. Hand cut round every laminated tag. (I'm wondering why i started this now!)
9. Crop-A-Dile punch all 144 tags.
10. Eyelet all 144 tags.
11. Book ring and add fibres to them.
12. Spend a day making the board.

The only reason i kept going was because my eldest learnt her tables so quickly with the one set i did the other day, i knew it would be worth it in the end. The look on thier little faces was a picture when they saw it. :)

I do however seem to have aged 10 years!

I would love to make these for the girls primary school, but i think it will be a while before that happens! :)

Tuesday 25 November 2008

Handy tip for hinged lids on ink pads.

As usual, i have come across a handy tip whilst breaking something! A tip that will probably be the most plainly obvious tip in history, but many people may not know you can do it without breaking something.

I'm talking about the hinged ink pads like Versafine and Versamark. I don't know about you, but whilst the inks is great, i find the hinged lids the most annoying and fiddly things to use ever! When trying to use the pad, i end up with ink on my hands, due to trying to hold the pad between my fingertips and trying to hold the top and bottom of the pad together whilst the pad swings about with a mind of it's own!

Or is that just me? Anyway, whilst being all masterfull with the Versafine just now, i kind of broke it....but i discovered the hinge mechanism can be removed from the pads top and bottom, leaving you with a top that just drops on and off of the ink pad.

Heres your normal hinged pad......


Now carefully, take the plastic hinge piece off, it has two slots each end that just come out of the holes......you may need to use a tiny bit of force but the hinge does bend slightly so you can remove it from the slots.......


There you go....you are now left with a normal...less fiddly ink pad. I wouldn't say it fits as tight as a Stazon pad or similar, but it fits fine and you don't end up dropping the thing on your trousers like me!


The hinge can always be replaced later if you want to, say for travelling or something.

Hope it helps. :)

Friday 21 November 2008

Times tables tags for the kids.

Here's a very easy project to make your kids which will help them no end, plus they look "cool" so they won't feel a numpty using them.

Laminated Distress Ink times table tags.......

.
My girls are having lots of times tables tests at school at the moment, so they are always grateful of something to remind them. These are so easy to make.
.
1. Just take 12 die-cut tags.

2. Stamp them with Stazon or Archival black ink.

3. Blend the tags with Distress Inks.

4. Write the times tables on them. (Just go carefull not to smudge the writing when you blend the inks....or write on the tag once you've inked it).

5. Laminate them.

6. Round the edges of the tags with scissors or a corner rounder, stops the kids getting scratched/cut on the sharp edges.

7. Punch and eyelet the ends.

8. Thread a book ring though the eyelets of each tag.

Hey presto......one set of indestructable times tables that your kids can refer to whenever they want. Small enough to fit in there pocket or school bag, laminated so the tags won't be affected by the grubbyness that kids attract!
.
The book ring means they can attatch them to things too, belt loops, school bags etc.
.
.
So whilst we are on the subject of maths, i have two girls, they need a set of these for each set of tables, thats two lots of twelve......and this one set took me about an hour......i think that equals no sleep for Daddy tonight!!! :)
.
Hope this helps. :)
.
Edited at 2:05am: If you are thinking about doing a whole set of these for your kids......be warned.....heres the result of a couple of hours on the BigShot.......
.
.
That's two complete sets of tables......244 tags!!! Now all i have to do is just stamp, blend, write on, laminate, eyelet and cut the corners off of every single one! I guess you could call it a labour of love!
Nite all. :)

It would appear i am a rodent!!!

Most people turn on thier computers in the morning and read the news, catch up with friends....maybe plan thier day ahead.

But not me.....oh no! I wake to find i've been immortalized in Fimo as a mischeivious MOUSE!!!

Over at Maddy's blog, she has done a most excellent tutorial on a colouring technique she discovered the other day. Well worth a look. However she also gives you a little look at another character from her craft room......"Calvin mouse"!


Complete with inky fingers, he looks to be a mischeivious fellow that will be worth keeping an eye on......heaven knows what he'll be getting up to in the future!

Thanks Maddy....i think! :)

Thursday 20 November 2008

Fruit i inked today!

Good morning fruit fans!!! :) Yes that's right, it is almost 2am on a Thursday morning and although a little bit earlier than usual, may i welcome you all to yet another episode of "Fruit i inked today!" :)
.
I am feeling triumphantly artified right now because today's fruit inking has been rather a success for me. After last weeks "Fairy hot air balloon", i was all engineered out and wanted to get back to basics with my fruit. It's ok making fantastic things out of fruit and bits of ribbon, but what happens if you're stuck in the middle of nowhere and you have to "just ink the fruit!?" Aha, yes i see you all nodding now...."Ah yeah....that's right Calv!"
.
So i sat at my workspace, inks in one hand, a selection of fruit in the other. Then one volunteer bravely took a step forward. He knew this was going to be a different kind of fruit inking, and he knew it wasn't going to be easy....but he stepped up to the plate regardless.
.
What resulted in the next hour, was what can only be described as a galactic stew of colour! So without further ado, good people of the four corners of our fruity earth, may i drench you in the colours of the AVACADO!!! (Don't forget you can enlarge the pics by clicking them).
.


Would you look at the colours on THAT little beauty!!!! I am so chuffed with the way this turned out, but it wasn't all plain sailing......oh no my friends, not at all!
.
I started off with another avacado, but it ended up a muddy mess, i'm even too embarrassed to show it on here. Then i got to thinking, "Whats my favourite way of making alcohol inks really stand out?" Then it hit me......UTEE!!! Yes fruit fans, i plastered the whole avacado in Ultra Thick Embossing Enamel. :) First i dried off the stone in the middle, Versamarked it then covered it in UTEE. The outside rim of the fruit was wet anyway so i figured it would stick to that too.......so i sprinkled away for all i was worth!
.
.
Let me tell you though, it takes forever to melt UTEE on fruit with a heat gun! Don't ask me why, i just ink the stuff. Some of it didn't melt as well as other parts, but overall it worked out pretty well i thought. However once it started melting, and i started to add ink to it.....well butter my rear and call me Mildred!!! It was the best colours I've ever got from playing with UTEE.....ever!
.
.
Kind of looks like a spaceship doesn't it? Definitely has some kind of alien thing going on in there. You could almost imagine a little alien head poking out of the egg in the middle there.
.
So then....the all important scores on the doors....the fruitinkability rating! Due to the fact that it was so much fun to ink, and it welcomed the UTEE so obligingly......and the colours turned out so well, I'm going to have to go with a mighty 9 for this one! Yes fruit fans, a whopping great juicy 9!
.
Just look at the stone on this most excellent subject!!!........
.
.
So there you have it for another episode of "Fruit i inked today!".
Thanks ever so much for coming along, i do so enjoy Thursdays because i know it's the only time i get loads of visitors lol. :) Just kidding ;)
.
Till next week....stay juicy everyone!!! :)

Tuesday 18 November 2008

Want a giggle?

Well look no further than my...what can loosely be described as an "effort" for this weeks challenge on "Objet D'Art". Jennie gave us an arty challenge involving a frame......so i tried doing something arty with it!


Before anyone asks.....no my kids didn't do this for me! I wish they had as they'd have done a better job!!! OMG doing something "arty" has got to be the hardest thing i have ever done since getting into crafting! I have new admiration for people like Jennie, and the many others who can make such wonderfull pieces of artwork. This just looks like i fell into my crafty stash whilst plucking a ginger chicken!!!


Firstly, it appears that the bits that took the longest to do, have not come out well on photo. Typical! First i sanded down a frame i found in a charity shop. Then i painted it white. Next i stamped it with some of Jennie's new swirls, they looked really cool like tiger stripes.

With those all around the frame, i thought i'd colour it a deep orangey red, so out came the spiced marmalade and fired brick Distress inks. The frame is really orangey, but it looks light in the pic.

Next i stamped, alcohol inked and UTEE'd some chipboard letters to spell out "ART", just so people know what this is supoosed to be lol! :)


I love using alcohol inks with UTEE, the heatgun blows the inks into all kinds of crazy patterns, you never know what you're going to end up with.

Now the trickiest part of the project, i used multi-coloured metallic thread to wrap all around the frame, but i also suspended each individual letter in the air with the thread too. This was really hard to do and very time consuming, but worth it in the end.


A few orange feathers, some fibres, blooms held on by upholstery tacks.....and a gold tassle on the side and there you have it! The biggest mess since Messy McMessy messed up his massive mess.....and made a huge mess!!!

Thanks you Jennie for introducing me to the world of art.....your stamps were great on the wood. :)

Look who's arrived at my house!

Well what do you know! In my grief stricken condition after having my one and only Sugar Nellie "Honey and Pip" stamp SNATCHED from under my nose!.......i felt the only option was to temporarily replace her with some others. These little beauties arrived this morning under armed guard.....no thieving so and so's are going to pinch these!


Want to know something funny? I just emailed the stamp thief, Maddy "Fingers" Hill this piccy, and as soon as she saw them she tried putting on that cute girly voice that all women do when they want something.......and said, "Oooh i really like the one on the end...i want her!!!"

Ha! I want good looks but it ain't gonna happen!!!

So now it seems that Maddy, after putting me through turmoil on the public stage, wants me to lend her my new ladies! That is laughable in itself! Do you honestly think I'd see them again?

I've told her that i "may" be willing to send her the stamp, or some images, if i get the other one back.....unharmed.......however she went off umming and arring like an ......."ummy-arry thing.

So the ball is in Maddy's court now! :)

Monday 17 November 2008

Magazine storage tutorial.

Hi all :)

Over the past week, i must have read at least a dozen requests for advice with magazine storage on various sites. This is always going to be an issue as long as the publishers keep bring out great crafty mags!

In the past I've mentioned wooden storage racks that I've made, but these aren't quite so easy to knock up in your craft room in 20 minutes. This however....is!
.
I thought of all the ways I'd seen magazines stored before, and when i was 12 years old, i subscribed to a magazine which i bought the binders for. I've modelled this crafty version on that storage idea.

All you need is an A4 ring binder, some pliers, some ribbon lengths and an eyelet setter.

Ok, here we go....first take your standard A4 ring binder.....


Now we want to get rid of the metal ring contraption in the middle. This is going to be the hardest part of this project. It is only held in with two eyelets, but they are tough little fellas, so i got some pliers and sort of pinched the edge of the eyelets together until you could shove it back through the hole in the binder.


Take it off back and front, eyelets too. You should be left with holes like this.

.
These can be easily covered up with a strip of card/paper.

.
The outside bit gets covered up the same, however you can fancy this up a bit more, even write a label so you can see what is stored inside. You may even want to have a folder for each brand of magazine, in which case you could be ultra organisational and include the name of the mag.

.
Now to work on what holds the magazines in the binder. Using a Crop-A-Dile, punch a hole at either end of the binder. Ensure you leave a few millimeters so you can slide a magazine in.
Secure the eyelet, nice side on the outside of the binder.....looks prettier that way!

.
Now you want a few lengths of ribbon, thin ribbon is fine. Make sure they are a couple of inches longer than the binder as you will need the extra length for tieing a knot. Tie your first ribbon at one end, just tie any old secure knot, pull it tight..but not overly tight that you can't fit a mag under it.....then tie it off at the other end.


You should now have this....

.
You will need a separate ribbon for each magazine, so just add them all either at the start when you make the binder, or add then as you buy each magazine.
Here I'll just do two for the tutorial.
.
.
As you can see, if you do them singularly, you end up with a knot for each ribbon. You may want to hold a few lengths together and thread them through. I just tried it and you can fit ten bits of thin ribbon through an eyelet. If thats too tricky, you could always place an extra eyelet either side of this one.
.
Now open your magazine to the centre pages, and slide it under the ribbon.
.
.
Close the first magazine, and you can see below that you have the next ribbon waiting to take the next mag.
.
.
Insert your next magazine exactly as you did the first.....
.
.
Hey presto.....here you have a quick, easy and affordable way of keeping your magazines safe and in good condition.
.
.
Hope this helps.....thanks for looking. :)

Saturday 15 November 2008

Flourish card.

Hi all, today i made this card using one of Jennie's gorgeous new flourish stamps from The Artistic Stamper.


These stamps are a joy to use, and helped me get over my difficulty cutting out flourishes. These are nice to cut without losing any detail.


It was also a chance for me to use a few bit's I've bought recently. The gorgeous McGill pine branch punch, and these little fabric roses i found in my local craft shop. The lace is a new thing for me, i have seen so many gorgeous card which feature lace, it was something i had to try eventually.
The only thing this is missing is some proper stitching, so i opted for a little false stitching instead. I am still trying the machine stitching on card, but i have ruined more than enough good papers trying to get it perfect. All in good time i guess.

Hope you like. :)


Friday 14 November 2008

Fruit i inked today!!! Almost....

Hi everyone......huge apologies for the lateness of my posting this weeks episode of "Fruit i inked today!", it's been as eventful as ever, so pull up a pew....or take a seat if you prefer....grab that cuppa and let me tell you ALL about it! :)

This week my fruity adventures have been plentiful and sorrowful all in one! Plenty of fruit to ink, but a sorry state they all turned out to be.....well almost. I had planned to ink a kiwi fruit, that little hairy gem of a fruit, however once ink hit kiwi, it just went downhill from there on. I may put a piccy up later, but i have a reputation to uphold you know. ;)
.
Then i went to ink a fig!!! I'd heard figs were an aphrodisiac, so i thought it may get some of my fruity fans in the mood for lurrrve! :) I'm sure it was an aphrodisiac, either that or a laxative.....not too sure now? Anyway the flamin thing was mouldy when i went to ink it....so in the bin that went!

So i had to make a decision, and not one that i took lightly. I decided to ink the fruit that i bought the other day "thinking" it was a fruit, because it was in the fruit isle.....but it turned out to be a vegetable!! Yes my friends, this week i have inked a "guest veg" on "Fruit i inked today". Now it was a bit shy at first, so I'll introduce you to it in the "before state".....fruity fans of blogland.....please say hi to the HARLEQUIN SQUASH!!!


Now this little beauty was just begging to be inked, but it needed something more. Now with that shape, there was really only one thing i could do wasn't there? Yep that's right people, i did what any other normal person would do on a Thursday night.....

I BUILT A FAIRY'S HOT AIR BALLOON!!!! :))))


How cool is that?!!! Oh yes my good friends, this veg was just built for this project, so build it i did! It was a bit tricky to ink, the long curves made the ink run away from me before i could do much with it. Photographing it was even harder! I tried holding it between my fingers under the light tent, but it was pretty heavy you know. Then when the fairy jumped in (they are quite heavy actually, very deceiving), it was very hard to hold, so i ended up whacking a hook in the top and using that.

Underneath you can see I've cut another coconut up for the basket, and of course crafty balloons do not have ropes, they have ribbons! :) I would like to thank my plant pot outside my front door for lending me it's fairy to use as a model, she was quite keen on the task actually, a change of view and all that jazz.

The maiden voyage went well, once around the craft room, the fairy threw up a couple of times but i never said i was a great pilot. I ink fruit for heavens sake......I'm not a pro balloonist!!! Yet look at her, bless....despite having ink in her hair....she looks so happy on her first balloon ride, who can argue with the satisfaction on that face? :)


Now then, fruityvegyinkability rating for this? I'm going to have to go for a mighty 8 for this one, partly because it was great to ink, but also for the adaptability of it. Despite being a veg, i think we can safely say it did us proud tonight. As for the balloon itself, I'm telling ya....Richard Branson would be proud of this one!

.
I have to leave you all with a rather sad bit of news. In the next few days, i am going to have to bin all of my frozen fruit, my babies are going to that big grocers in the sky. :( Sad i know, but i think if we all rally round, we'll get through this together. I'm not saying it will be easy, far from it, but i do like to think that when one freezer door closes, another one opens. The old fruit will make room for the new. The next generation of fruit, and very shortly....the vegetable! :)
.
Oh yes, before i go, here's the kiwi fruit, i sliced it up into segments and inked it randomly......turned out OK i guess but the rest was a mess....and at the end of the day it's no fairy hot air balloon!


So i thank you once again for sitting through what has to be the biggest load of waffle on the worldwide web.......some may call me barmy, but hey.......it's you lot who come back every week for more lol!!! ;) Cheers for that. :)

Take care everyone, tune in next week for another episode of, "Fruit i inked today!".

Wednesday 12 November 2008

Mixing primary colours in your projects.

As an added little nugget of knowledge to go with the Distress Ink blending tutorial i did the other day, i wanted to share a quick tip about colour mixing. I was prompted to write this after an excellent question from Sarah C . She asked what colours would i advise getting if she wanted to buy maybe just a couple of colours to get started with. This is such an excellent question for many reasons.

Firstly, opinions on this will differ, but differences of opinion encourages debate which leads to more knowledge.....so all is good! :)

Secondly, the cost can be a major factor when getting together a starter pack for a new craft subject. By the time you buy the applicator, the foam pads, and lots of the ink pads, you can be looking at a pretty penny. Having two kids, and still awaiting that lottery win, i know than any tip to cut costs comes in handy at times.
.
So then...Primary colours: This will be something probably all of us will have done at school at some point, however like a lot of our school knowledge, it gets lost in life unless really needed. What many people forget is, that when you blend colours, you get other colours! Like me, you will often be reminded of this fact by accident, or when you blend colours into each other and are rather pleased with the colour you've produced without meaning to!


The primary colours are red, blue and yellow, and from these, you can get a whole range of other colours.......take this colour circle above, the primary colours are in the middle, then as you come outwards you see what colours they can be mixed into. The colour variations then come into their own according to how much of one colour you mix with another.

Red mixed with yellow will make orange, blue with yellow makes green, blue with red makes purple.....and so on. This has limitless boundaries, which you can explore to your hearts desire.
So don't think that just because you only have 3 colours in your paint pots or ink pads, that's all you have......go have a play and discover some new colours! :)
.
Before anyone says that this only works with paints, it does work with distress pad inks too...I've just tried it to double check. :) Just make sure that you check your pad before you want to use it for a single colour again, as you may have some blended colour on there which will of course alter your single colour.
.
Below are the three colours i just tested....Fired Brick (red), Broken China (blue) and Mustard Seed (yellow).


.
I experimented with a couple of mixes, you can of course take this as far as you want....
.
.
There is a wealth of info out there on this subject, and I'm sure many people will have a vast knowledge on colour mixing. Above is just the little tip I've learnt along the way, mostly from people like Maddy who is a wealth of knowledge when it comes to colour and arty stuff.
Another tip Maddy just reminded me of, you can dab the distress pads onto a Teflon mat or anything plastic, like a CD cover, then use that as a mixing pallet. Then transfer the ink to your work.

For those wanting to learn more on this, Google things like "Primary colours", "secondary colours", "colour theory", "colour mixes"...things like that. This is what i love about crafting, you come across a subject you are not too knowledgeable in, and you go and learn so much about it that you end up being able to pass it on to others.
.
Personally, i think every craft room should have a colour wheel or chart, it is such a handy thing to have for that little reminder about achievable colours. (Something i confess to not being very good at.) Better still, go and make your own funky colour wheel. Whether it's a masterpiece of a million different shades, or a piece of A4 card with just a few mixes on it. That way, you gain the experience of mixing the colours yourself whilst creating a very useful tool.
.
So once again, a big thank you to Sarah C for jogging my memory on this one, and thanks to Maddy for what I've learnt from her about it so far.

Thanks for stopping by :)

Monday 10 November 2008

Handmade paper wallet.

What should every male crafter never be without? A handmade paper wallet!!!


This wallet is modelled on one i own, except this one is made entirely from paper. It is fully functioning, as you can see it hold my bank cards, money and even has a business card or photo holder.


I used the new Basic Grey "Wassail" papers which i distressed and inked, some nice flourish stamps and finished it all off with some white false stitching. I added some antique brass eyelets which matched the browns of the paper nicely. The plastic which houses the business card or photo, i cut from a packet that my stamps came in. I used this as it was perfectly clear, thin and flexible enough to cope with when the the wallet was folded.

It's even personalised!


Thanks for looking, hope you like it. :)