Pages

Wednesday 29 October 2008

Would be rude not to wouldn't it!!!?

A very fine Thursday to you all inky fruit fans! Actually it's Wednesday night......but i was so excited i had to post this early lol......

It's that day again when we forget just for a few minutes who's having an affair with who on your favourite TV soap, forget about all those important chores that need doing, and forget about feeding the family....because once again it's time for......."Fruit i inked today!!!".

However something is different this week. There is something in the air, something mystical, magical.....dare i say hauntingly terrifying.....yes folks it's Halloween!!!! :)
So this week, influenced by the hundreds of fantastic works of art i have seen on the net at this spooky time of year, i thought it only right that i should stray from the fruity path and ink a....

PUMPKIN!!!


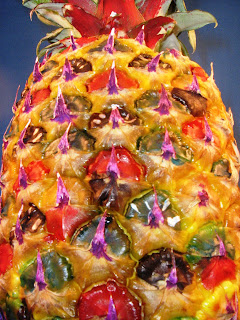
Now usually i have always done the basic two eyes, a nose and a smile on my pumpkins. However this year, and especially since i have started blogging, i have been totally gobsmacked at the amazing pumpkins out there! Some fantastic works of art, all hand carved. So i thought it was only right that i try my hand at some kind of design, so i went with a basic scary skull.
I was pretty impressed as it was my first try, but even more impressed when i saw it in full effect with the lights off!


A success!!! As far as the inking was concerned, you may be wondering about the lack of colour. Well i thought that to keep the Halloween look, I'd keep as much orange as possible, yet i wanted to use some ink at least.....after all it is that time of the week! So i opted for what can loosely be described as tiger stripes. Just using Adirondack "Pitch Black", i had a great time making this scary fella stripey!

.
Now unfortunately, i did not have one of those Dremel hobby drills that many people seem to cut intricate patterns out with, so i made do with a scalpel, a pokey tool and a big DIY drill! :)
Hence one of the teeth being slightly wonky, it's difficult being as precise as a dental surgeon with a drill i usually put shelves up with!

.
After trying to keep the pumpkin steady whilst i used this drill on the teeth, i decided to cross my legs and hold it between my thighs whilst i did the rest of the teeth. So as i am sure you will appreciate, being in that position....the last thing i was worried about was me drilling a wonky tooth!!!
.
The only mishap was that afterwards, whilst admiring my masterpiece, i noticed i'd cut the bottom off instead of the top lol.....but i won't tell if you don't! :)
.
Despite this being a vegetable, i'm going to give the pumpkin an honourary fruitinkability rating of 8......purely because this was such a cool thing to make and ink.
.
Thanks for tuning in everyone, i hope you like my pumpkin, and i hope you have a great night on Friday.......watch out for those witches!!!!!!!! :)))

Tuesday 28 October 2008

A magical discovery.......

Today I've been missing my girls quite a lot. They are back with me in a couple of days but it's so quiet around here without them, so i decided to make a quicky project that they would appreciate.

My girls, like most little girls, are fairy mad. Ok, they have grown up a little now, but they are still always on the lookout for that tiny hint of magic that may be evidence of fairies. In the woods they will run up to the slightest hole in a tree, thinking it's a fairy house. :)

Well yesterday i picked up a little wooden chest in second hand shop, very plain, very new.....well it was.....


I wanted to create the feel of something the girls would find on one of their typical adventures through the forest here. I could just picture them finding a tiny box, covered in twigs and moss, so cautiously and filled with excitement.....they open it.....


The squeal with excitement!!! Inside is a few leaves, and what appears to be the outline of a tiny fairy that has been having a lie down in old the dusty chest......


....it's tiny angel hair blanket, lined with delicate fibres lay strewn under the ivy, obviously "somebody" left in a hurry!


I started off painting this chest white, and was going to try distressing it, however an experiment with a homemade wood stain wash went slightly wrong, so i continued with the enchanted fairy chest idea. It was very plain to start off with....


Some dark moss chalk inks gave the chest a bit of green here and there, i used real twigs and a couple of bits of real ivy....from my fence again! :) The lovely dark red ivy leaves are courtesy of Carolyn's shop over at Crafts By Carolyn's, they arrived this morning in the post as part of a prize i won on the forum.....cheers Carolyn!
The fairy outline was done with part of a Lavinia fairy stamp, i stamped an image, cut it out, and did a light dusting of chalk ink around the mask.

So that's my crafty fix sorted for the day, thanks for looking, i hope you like it. :)

Monday 27 October 2008

Warning!....Ink bottles squirt!!!

On Friday i received some new inks fron Jennie at The Artistic Stamper, and was very excited to test out my new "pink" Zig alcohol ink. I wanted something nice and bright to enhance my fruit inking.

So i opened the bottle, pierced the top with a needle and when i took it out i was met with a fountain of pink! Result......one pink thumb!!!


Believe it or not, this was AFTER washing it! However it did ensure i fitted right in with the evenings activity, i took my girls to see High School Musical 3 and the pink was most definately at home with the rest of the outfits worn!

Three days on, my skin is back to normal, however my nail is still a lighter shade of bright pink. I do seem to be getting some funny looks when i pay for things in shops, personally i just think they are jealous! :)

So watch those alcohol ink bottles people.......meanwhile, i'm applying for an adult to supervise me during crafting! :)

Sunday 26 October 2008

Distress inking a cork notice board.

I need a notice board for my craft room, so i got one of those cheapy ones from Staples.

It was "lacking in colour" shall we say, so i stamped around the edging strip with a flourish stamp and archival black ink. Next i got out my foam blending pads and distress inks, and just had a play.


It didn't turn out quite as expected, i should maybe have left it at just doing the edge. The chequered stamp was really just to see if it stamped ok on cork, which it did quite well.


This was just a tester board, so that you...and i get an idea of what is possible. I just couldn't bear seeing a boring plain cork board in a room that is supposed to be full of colour!

Easy way to display your makes.

Hi everyone :)

Quick post tonight, or should i say this morning! The clocks have gone back here in the UK, so we get an extra hour asleep or so they say, however as i sleep about as well as a.....well something that doesn't sleep very well, so i guess that means another hours crafting! :)

I am having trouble finding places to display some of the makes that i keep. So tonight i knocked up this super easy hanging storage for them. (I've led it down to photograph as i haven't decided where to hang it yet).....


How much easier can storage get eh? Just a few wooden clothes pegs, stamped on with black archival ink using a stamp of your choice (i used a large journey stamp with lots of postage marks and writing on), then thread some string or nylon cord through the metal spring like i have done.....


I am going to leave my pegs as they are, but you can colour them as you wish. Here i used red pepper alcohol ink to give it some colour....just be careful not to ink the inside where the peg grips your make, it could leave a mark.


The great thing about this, is that you can hang them anywhere. Under existing shelves between the brackets, across doors and windows, wherever you feel like it.

It's only a very simple idea, but the pegs have potential to be artified up to the max if you wish.
Another great hanging display option are these lovely little wire hangers which i purchased from Jennie at The Artistic Stamper. There is also another style too which has a book plate on it for naming if you wish.
Ideal for giving a nice antique "arty" feel to your work.

I hope it proves useful to someone out there. Thanks, and Nite all. :)

Thursday 23 October 2008

Tip for cheap fibres.

As i've travelled around some of the more gorgeous crafty blogs on the net, i've realised i need to start raising my standard as far as crafty makes is concerned. At least spend more time on the finer details.

To do this, you obviously need some nice bits of stash, or at least it helps. However some items don't come cheap. Fibres are something i am lacking in greatly, and i can't stand spending out loads on a few tiny bits that get used up in one go, so today i was well chuffed when i found these balls of knitting yarn in a cheapy shop.


I love these as i am so taken with autumn colours this year.....well for the first time ever actually. That is pretty sad considering i live in the forest where there are some of the most gorgeous colours blooming all around me, but until recently i've just not been that bothered about the colour.

However this is the first autumn where i have really taken notice of colours, probably due to blogging and seeing everyone else's fantastic creations.

Lea got me addicted to orange with the help of her stunning pumpkin and corn maze photos here, and theres been so many autumn cards and layouts that you cannot fail to get hooked on the colours. So these were a great find, i could just picture them embellishing the book rings of an album or accentuating a tag.

Except this cost me 75 pence for a ball......i'm not sure i'd get that many fibres for that price. If i mix all three together, they will be lovely.

So next time you're shopping, take a look in the nearest wool shop for the more unusual yarns, you might be saving a packet on your fibres.

Wednesday 22 October 2008

Fruit i inked today!!!

Arrhhhh......land ahoy shipmates!!! That was my best pirate impression, which may give you a clue to this weeks guest fruit on "Fruit i inked today!".

I've been toying with this idea for a while, but there seemed to be too many obstacles with it. However i when i assign myself a fruity mission, the only option is to achieve it at all costs!

So as it's just turned midnight on what should be a mighty fine Thursday, fruit lovers of the world, i give you......the COCONUT!!!


How about this for a beauty!!! For something that started off almost doomed to fail, i am really chuffed with this weeks results. Grab a cuppa, get ya bum comfy and let me explain.....

I saw a whole box of coconuts in my local grocers, so it a fit of excitement i bought a few and brought them home. Then i encountered my first obstacle, how to crack it open neatly! It doesn't work too well with a hammer, or a brick, or the heavy end of a child's scooter (Lets keep that one between us). Plus i found that all the coconuts that i tried, were dried out inside. Not a good start.

So out came my trusty tenon saw....
.
.
This worked a treat, and the fact that it was dry was actually a help, not a hindrance.
.
.
I don't know if you are aware, but it's really quite hard to ink something that is round. The slightest spot of ink runs all over the place and you end up juggling it to keep it in place, so to get the individual patches took some doing i'm telling you!
.
The best part of this weeks inking, was using a lilac "Zig" alcohol ink i got from Jennie at the Artistic Stamper. It is quite a dark lilac, i would go as far as saying purple but it worked gorgeously on the white of the coconut. In fact, i liked the lilac so much i went totally over the top on the on the half of the coconut. It was a bit dark though, so i added a sprinkling of ultra fine holographic glitter, i thought it made the coconut look like one of those cool pieces of rock with the crystal formations inside.
.
.
Aha my inky friends.....the story does not stop there! Maddy suggested the great idea of using them as a tea light candle holder....so i took a couple of piccies in the dark.....
.
.
Doesn't that look spectacular! Obviously i waited until the ink was well dried before i did this, what with the inks being highly flammable, but it was worth the wait.
.
And the other half....
.
Now then, the fruitinkability rating? I am going to easily go with an 8 for this one! I think thats a new record for "Fruit i inked today!" Oooh....do i hear a few boos and hisses? Mutterings of, "How can that beat the legendary pineapple?!!!!.....FIX!!! FIX!!!!!!!!"
.
Calm down people, this for me was almost on par with the pineapple as far as fun to ink and pleasure to ink, however the fact that it has another use as a candle holder, and therefore this will not be destined for my freezer.....tips it over the top in the fruitinkability ratings.
In case anyone was wondering why i didn't do anything with the outside, i did try but it just didn't work out. I tried giving it a haircut but it was having none of it. I tried inking it, far too brown and woodlike to play along.
.
Thanks everyone once again for stopping by to see what inky mess i've made this week. Without you lot, my fruit would merely be a sad fetish which could have got me locked up by now! Till next week..... :))
.
Oops.....almost forgot to say......i almost didn't show you the coconut this week......i was a little SHY!!! :))) Get it? Coconut shy? :) Just listen to those groans! :)))

Tuesday 21 October 2008

It's a fruity obsession!!!

I think i need help!!!

Whilst i can hear many of you saying "Yes we knew that already Calv!", i really mean it.

This morning i went into my local grocers with the sole intention of getting some nuts and a few sprouts....however ten pounds later i came out with this little lot!!!

.
Theres a pineapple, oranges, coconuts, papaya, limes, passion fruit, pears, and some other little beauties that i found across the road in a flower shop!
Funny thing is, i just know that probably one or two out of that whole lot will end up being eaten, the rest will be artified in some way. :)
.
The highlight of my morning was discovering these little fellas.....

.
At the front is a dried orange and a lime, artfully split around the sides. These look and smell amazing and are sold as pot-pouri. I'm going to try making some later.
.
Behind them are what i first thought were magical tiny pumpkins, but then found out that they are gourds. I'd never seen these before and was fascinated, they look like a pumpkins just given birth! :) They are only about three inches high.....How cool is that?!!!
.
.
The gourds are quite hard so would make excellent materials for an art piece, especially with halloween approaching.
.
So if anyone knows of any therapists that specialize in fruit obsessions, i would be most grateful!

Monday 20 October 2008

My fave colour...purple!

Over at Ink On My Fingers, Hel's has set a challenge to make something with the colour purple. Click here to see the challenge.

I had to jump on this one as i love purple, any shade, i just love the colour. It has a mystical feel to it and i like that.

So as usual, i sat for what felt like hours at my crafty space, made a huge mess, spilt a few things, threw a few things.....and at the end of it emerged this tag.

.
Very, very basic, but i love the purple, i love the flourish stamp, and after the housework that my kids have left me with, i wanted to make a dreamy piece where instead of looking out of the window at a nice scene......i could look inside my house and see a gorgeous sight instead of the mess that i am sat in at present!!!
.
.
Much use of sticky fixers here, the tag is raised up from the rear one for depth, and the window frame is raised with sticky fixers for further depth, so it really does look like you are looking through a window.
.
The lovely backing paper is courtesy of the Crafty Individuals stack, and the picture frame wood is courtesy of Starbucks! Their coffee stirrers are great for crafty projects! (Ask them first though, you'd look pretty weird getting caught stealing wooden stirrers!)
.
The tassel is possibly a bit much, but i like it so there! :) You may notice the window frame is slightly wonky compared to the bottom of the cut out window. This is due to me accidentally standing on the tag whilst trying to photograph it...don't ask.
.
Ok i'll tell....my light tent is on my craft room floor, i tried to pull a light that i use for the top lighting off of my desk, and i pulled a whole load of crafty tools on top of me. Gluesticks, craft knives, scissors....they got caught in the light flex. Then when i stood up after taking the pic, i stood on a brad, hopped to get off of it....almost stood on a scalpel, then a glue stick.....just missed cracking my head off the worktop.....and finally stood on my tag!!!
.
Thanks for the challenge Hel's, you couldn't of picked a better colour. :)

Sunday 19 October 2008

Fimo toadstool tutorial.

Ok folks, i've had a few people asking how i made these toadstools, so i have done a basic tutorial with some pics to get you there. Please remember, this is about the third time i've ever dabbled with Fimo, so whilst it shows that anyone can do this, it also means i'm no expert. This is just the way i made them, there are probably better ways around though.

So here we go...oh and before i start, if anyone wonders why i have a lot of full stops or dots between my paragraphs, it's because Blogger is seriously having a giggle with my posting abilities at the moment, no matter how well i space them out in the editing thingy....it just crams them together when i publish!!! Hopefully the piccies are ok, i'm doing it by daylight bulb in my craft room...

Moan over.....here we go......take two!.... :)

First you need some Fimo, i used the Fimo Classic here....


Cut off 1/4th of it, that's all you need for a toadstool of this size...
.

You now need to make two balls of equal size. To do this, just cut your piece in two before you start rolling the balls......cheers for that tip Maddy! :)


Then roll the two balls......one will be your stem, and the other your top.

.
Take the first ball, and roll it into a sausage shape.....


Then taking an end in each hand between the fingers, twist it alternating ways (one end forwards whilst the other twists backwards......apologies if that sounds like i'm teaching anyone to suck eggs, believe me when i say i need to make it clear so that I can remember it!!! :)
Now you have your twisted stem. You don't have to have a twist in it, in fact i'm not sure that real toadstools do at all.....i just like it!

.
So that's your stem done. Put it to one side and take your second ball of clay. Flatten it with the pad of your finger/thumb until it's quite flat, about 3 or 4 mm.


Now to mark the underside with the toadstools gills....i just marked a dot in the middle as a guide, then pressed with the blade of a craft knife to get the markings. Tip, if you find it hard spacing the lines out properly, mark a cross, then half the segments in that, then half the segments again......and so on. It doesn't have to be perfect though......have you ever seen a toadstool that was?
.
.
Turn it over, then for added effect, i cut small chips into the edge of the toadstool...
.
.
Next take the toadstool roof, and press the edges slightly to thin out the rounded edges. You can use two hands for this, one to hold, one to press. I just couldn't as i had to take a piccy!
.
.
That's the roof done......now push the stem up into the centre of the roof. Do this firmly enough to make it stick, but gentle enough not to go through the top. Hey presto....one Fimo toadstool!!!
.
.
Please do not fret if you think it looks rubbish at this stage, once it's gone hard and you have added some colour later, it looks so much better! Really brings out the realism to it.
.
Now go and stick it in the oven. I did mine for 30 mins at Gas Mark half, or 110 degrees F/240 degrees C. Once done, let it cool thoroughly.
.
Time to give it some colour. Below are the colours i used. A Dark Moss and charcoal Colourbox ink, and a Fired Brick and Tea Dye Distress ink pad. These were applied with a standard 1/2in paint brush i found in my shed. Oh yes...only the best tools for Calv! :)
.
.
First off, i applied the Dark Moss to the stem. I just jabbed the brush into the ink pad, then flicked the brush around the stem rather than "painted it. This ensured any little nooks and cranny's were coloured.
.
.
Then i turned it over and did the underside in Charcoal ink...
.
.
I just gave the edge a little ink too......
.
.
Lastly, colour the top. I used two layers of colour on this one, Tea Dye first then after a quick dry with a heat gun, i brushed it with Fired Brick to give it a reddish hint.
So there you go.......one finished toadstool!

.
The underside......
.
.
Thanks for staying awake through this, this really is a simple piece to make, even my ten year old made one to this standard today with only verbal input from me. I would love it if you could pass this method on to anyone who is new to Fimo like myself, and if that someone was a little one, it would make it all the more special.

Fimo toadstool!

Last night i had a play with some Fimo that i bought recently. I was inspired to do this by Maddy's latest Fimo creation over at her blog here.

Whilst i can't produce the comical characters that Maddy made there, i did have a dabble at something real simple, something not even i can mess up! As a build up to a larger project i would like to do later, i tried my hand at a basic toadstool. I didn't want it too bright and colourfull, i wanted a realistic one....or as close as i could get it.

Heres my first effort....


.
This was so easy to make, i did it in two seperate parts, the stork and the toadstool top. I purposely made the stork twist, i wanted an old distorted look to it.
.
.
The colours have limitless possibilities, i just attacked these with some ink pads and played with several colours. No particluar technique, just layered a few colours. I am not too keen on the glossy finish to the colour, but it may dull as it dries more. (Edited to say it's been a little while since i made this, well over half an our anyway and although it has dried, it is still glossy) That could be remedied with some matt varnish.

Next time i will mark some gills underneath too for extra effect.
Aha! Updated this post to show the next one i made.....with a bit of colour and gills underneath...i think they are called gills anyway, unless i'm thinking of fish!?

.
Will do the stem a bit thinner next time too....


.
And the underneath.....
.


This was a very relaxing project too, so i highly recommend getting some Fimo and seeing what happens.